How to Set Up Your Blog on WordPress In Best 5 Steps?
Table of Contents
Introduction How to Set Up Your Blog on WordPress
Blogging has become a powerful tool for personal expression, business growth, and community building. Creating a blog allows you to share your thoughts, showcase expertise, and connect with like-minded individuals. In today’s digital age, having an online presence through a blog can significantly enhance your visibility and credibility.
WordPress stands out as one of the most popular platforms for bloggers of all levels. Known for its versatility and user-friendliness, WordPress allows you to create anything from a personal blog to a professional website. With thousands of themes and plugins available, you can customize your blog to suit any niche or aesthetic preference.
Setting up your blog on WordPress is a straightforward process that can be broken down into five simple steps:
- Choose a Domain and Hosting: Selecting the right domain name and web hosting provider sets the foundation for your blog.
- Install WordPress: Get your site up and running using different installation methods.
- Select and Customize a Theme: Reflect your personality or brand with the perfect theme.
- Create Essential Pages and Set Up Navigation Menus: Enhance user experience with well-organized content.
- Write Your First Blog Post: Start sharing your ideas with the world.
This step-by-step tutorial will guide you through each stage, ensuring a seamless start to your blogging journey.
Step 1: Choose a Domain and Hosting
Why Choosing the Right Domain Name and Web Hosting Provider Matters
Choosing the right domain name and web hosting provider is crucial for building a successful blog. Your domain name represents your blog’s identity online, while a dependable web hosting service ensures that your site is always accessible to readers.
What Makes a Good Domain Name?
A memorable domain name should:
- Reflect your blog’s purpose or niche.
- Be easy to spell and pronounce.
- Avoid using hyphens or numbers, which can confuse potential visitors.
What to Look for in a Web Hosting Provider
When it comes to web hosting, you need a provider that offers:
- Reliable uptime so your site is always available.
- Fast load speeds to improve user experience.
- Strong security features to protect your data and users’ information.
Custom vs. Free WordPress.com Address: Which One Should You Choose?
You have two main options for domain names: a custom domain or a free WordPress.com address.
Custom Domain
Pros:
- Professional appearance: A custom domain (e.g., www.yourblog.com) looks more professional and trustworthy than a free option.
- Branding opportunities: It offers greater flexibility for branding and marketing.
- Better SEO: Search engines tend to favor custom domains over subdomains.
Cons:
- Cost: Custom domains require an annual fee, typically ranging from $10 to $20 per year.
Free WordPress.com Address
Pros:
- No initial cost: Ideal for those just starting out with limited budgets.
Cons:
- Limited branding: Includes “WordPress” in the URL (e.g., www.yourblog.wordpress.com), which may not convey professionalism.
- Limited control: Less flexibility in terms of customization options and monetization strategies.
Bluehost as a Recommended Hosting Provider
Bluehost is highly recommended by WordPress due to its excellent features, competitive pricing, and supportive customer service.
Features of Bluehost
- One-click WordPress install makes it easy for beginners to get started.
- Offers 24/7 customer support, ensuring help is available whenever needed.
- Provides a free SSL certificate, enhancing website security.
Pricing Plans Offered by Bluehost
Bluehost offers several pricing tiers:
- Basic Plan – Starts at $2.95/month with one website allowance, 50GB SSD storage, and free domain registration for the first year.
- Plus Plan – At $5.45/month, includes unlimited websites, storage, and email accounts.
- Choice Plus Plan – Also $5.45/month initially but with added privacy features like domain privacy protection.
Customer Support Provided by Bluehost
Bluehost’s customer support is known for being responsive and knowledgeable. You can reach them via live chat, phone calls, or email tickets anytime you face technical challenges.
How to Purchase a Domain and Set Up Hosting on Bluehost
Setting up your blog on Bluehost involves the following steps:
- Visit Bluehost and click on the “Get Started” button.
- Choose your desired hosting plan based on your needs.
- Register your custom domain name or transfer an existing one.
- Fill in personal details including payment information.
- Complete the purchase to activate your hosting account.
Once you’ve completed these steps, Bluehost simplifies the process with its intuitive dashboard where you can seamlessly install WordPress with just one click. This streamlined process ensures that you can focus on creating content rather than getting bogged down by technical details.
By choosing both an appropriate domain name and a reliable hosting service like Bluehost, you’re setting up a strong foundation for your WordPress blog that will support growth and engagement over time.
Step 2: Install WordPress on Your Blog

WordPress Installation: Methods and Choices
Getting WordPress up and running on your hosting account varies in complexity, depending largely on the method chosen. Typically, there are two main approaches: manual installation and one-click install.
Manual Installation
- This method involves downloading the WordPress software from WordPress.org and uploading it to your hosting account via FTP (File Transfer Protocol).
- You need to create a MySQL database and configure the
wp-config.phpfile to connect your site with this database. - While this approach offers more control over the setup process, it requires a certain level of technical expertise, making it less ideal for beginners.
One-Click Install
- Most modern hosting providers, including Bluehost, offer a one-click install option. This feature simplifies the setup process significantly.
- With just a few clicks through your hosting control panel, you can have WordPress installed without needing to delve into complex configurations or file transfers.
Benefits and Drawbacks of One-Click Installation
Opting for a one-click installation provides several advantages:
- Ease of Use: For those new to website management or lacking technical skills, this method is user-friendly and time-saving.
- Speed: The entire process completes within minutes, letting you focus more on customizing your blog rather than technical setup.
- Support: Hosting providers like Bluehost often include support for troubleshooting any issues that arise during installation.
However, there are some drawbacks to consider:
- Limited Customization During Setup: Manual installations allow for more customization options upfront which might be limited in automated setups.
- Less Learning Opportunity: If you’re interested in understanding the inner workings of WordPress installations, manual methods offer deeper insights.
In practical terms, using Bluehost as an example, starting with their one-click install feature can ease the transition into self-hosted WordPress. After logging into your Bluehost account dashboard, locate the “My Sites” section and follow prompts for creating a new site—it’s straightforward and efficient.
Step 3: Select and Customize a Theme for Your Blog
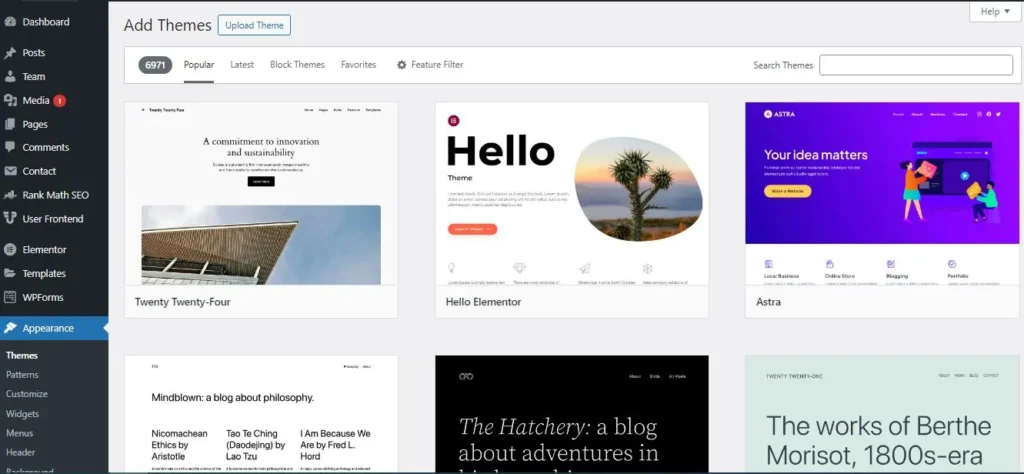
Choosing the right WordPress theme is crucial for setting the tone and aesthetic of your blog. A well-selected theme not only enhances the visual appeal but also aligns with your blog’s purpose and target audience. Here’s how to navigate this important step.
Choosing an Appropriate Theme
Selecting a theme that reflects your blog’s identity involves considering both aesthetics and functionality. For example, a photography blog might benefit from a theme with large image sliders, while a personal finance blog might prioritize text readability and clean layouts.
- Identify Your Blog’s Purpose: Determine whether your blog will be content-heavy or visually oriented.
- Consider Target Audience: Think about what appeals to your readers; a professional tone or a casual, friendly layout?
- Real-Life Example: If you’re creating a travel blog, the ‘Astra’ theme offers customizable layouts with full-screen headers perfect for showcasing stunning photos from around the world.
Free vs. Premium Themes
The WordPress directory offers thousands of themes, both free and premium. Understanding their differences helps you make an informed choice.
Free Themes
- Advantages: Cost-effective, ideal for beginners.
- Drawbacks: Limited customization options and support.
- Popular Free Themes: ‘Twenty Twenty-One’, ‘OceanWP’.
Premium Themes
- Advantages: More features, better support, enhanced customization.
- Drawbacks: Costs can range from $30 to $100.
- Recommended Premium Themes: ‘Divi’, ‘Avada’ for versatile design capabilities across various niches.
Customizing Your Chosen Theme
Once you’ve selected a theme, use the WordPress Customizer tool to tailor it to your needs. This tool offers real-time previews of changes, allowing you to personalize your site efficiently.
Step-by-Step Guide to Theme Customization
- Access the Customizer:
- Navigate to your WordPress dashboard.
- Click on Appearance > Customize.
- Modify Colors:
- Select the Colors section to change background and text hues.
- Ensure color choices enhance readability and align with branding.
- Adjust Typography:
- Choose fonts that reflect your blog’s tone; serif fonts for traditional blogs or sans-serif for modern appeal.
- Adjust font size for optimal reading experience.
- Set Layout Options:
- Explore settings under Layout to configure sidebar positions or full-width displays.
- Experiment with different options until you find one that suits your content structure.
- Preview and Publish:
- Use the preview feature to see changes in real time before applying them live.
- Once satisfied, click on Publish to save adjustments.
Customizing your theme not only enhances the user experience but also solidifies your brand’s online presence. By aligning design elements with your blog’s objectives, you create an inviting space for readers to explore your content.
Step 4: Create Essential Pages and Set Up Navigation Menus for Your Blog

Creating essential pages on your blog is a critical step to establish a professional presence and enhance user experience. These pages serve as the backbone of your site structure, providing visitors with key information about you and your content. Here’s a breakdown of the essential pages every blog should have:
1. About Page
This page offers insight into who you are, what your blog is about, and what readers can expect from your content. It’s an opportunity to connect with your audience by sharing your story, mission, and vision. A compelling About Page can foster trust and engagement.
2. Contact Page
Providing a way for readers to reach out is vital for building community and networking opportunities. Your Contact Page should include an email address, social media links, or a contact form. Tools like WPForms or Contact Form 7 can help create simple yet effective contact forms.
3. Privacy Policy
A Privacy Policy is not just essential; it’s often legally required. It informs users about how their data is collected, used, and protected on your site. There are plugins like WP AutoTerms that can assist in generating a compliant Privacy Policy tailored to your blog’s needs.
Once you’ve established these foundational pages, the next step is organizing them through a navigation menu. A well-structured navigation menu improves site structure by making it easier for visitors to find information quickly.
How to Create a Navigation Menu
To set up a navigation menu linking to essential pages and categories:
- Access the WordPress Dashboard: Log in to your WordPress admin panel.
- Navigate to Appearance > Menus: This section allows you to manage the menus on your blog.
- Create a New Menu: Click on “create a new menu” link, give it a descriptive name (e.g., Main Menu), and then select “Create Menu.”
- Add Items to Your Menu:
- Use the left-hand panel to find pages, posts, custom links, or categories.
- Check the items you want in your menu (like About, Contact, Privacy Policy) and click “Add to Menu.”
- Organize Your Menu Items:
- Drag and drop items into position.
- Consider using sub-menus if necessary for better site structure.
- Assign Menu Location:
- Choose where this menu will be displayed (e.g., primary navigation).
- Save changes by clicking “Save Menu.”
A thoughtfully designed navigation menu enhances user experience by ensuring that visitors can easily explore all areas of your blog without frustration or confusion.
By focusing on these essentials now, you’re laying down an effective foundation for growth as you continue developing your WordPress blog which can be done effectively by following these steps.
Step 5: Write Your First Blog Post and Publish It on Your Site!
Starting your content creation journey begins with writing your first blog post. Here’s a simple guide to get you started:
Accessing the Post Editor
- Log in to Your WordPress Dashboard: Go to
yourdomain.com/wp-adminand enter your login details. - Go to the Posts Section: On the left-hand menu, click on Posts. Then select Add New to open the post editor.
Creating Your First Blog Post
You’re now ready to start writing blog posts that capture your ideas and engage readers.
- Add a Title: Write an attention-grabbing title for your post in the ‘Enter title here’ box. A catchy and informative title can significantly impact whether visitors decide to read your post.
- Compose Your Post: Use the content area below the title to write your main text. This section supports rich text formatting, allowing you to enhance readability by structuring content with headings, lists, and paragraphs.
Structuring for Readability
Creating a well-structured post is essential for keeping readers engaged:
- Use Headings: Break your content into digestible sections using headings (H2, H3) as you see fit. This helps readers scan through information quickly and improves SEO.
- Paragraphs & Bullet Points: Keep paragraphs short for better readability. Use bullet points or numbered lists for clarity when presenting complex information or step-by-step instructions.
- Incorporate Images: Add visuals by clicking on the ‘Add Media’ button. Images not only break up text but also make your post visually appealing.
Publishing Your Post
Once satisfied with your draft:
- Preview Your Post: Click ‘Preview’ at the top right corner of the editor to see how it will appear on your site.
- Publish It Live: When ready, hit the ‘Publish’ button to make your content available to readers worldwide.
Remember, writing is an ongoing process. Regularly revisiting and improving past posts ensures they continue providing value over time. To aid in this process, consider utilizing some helpful resources such as these blog framework chatgpt prompts for writing articles which can streamline your content creation efforts.
Conclusion
Starting your blog is an exciting venture, and with the steps outlined in this guide, you have all the tools needed to get started. Once you’ve learned How to Set Up Your Blog on WordPress: A Step-by-Step Tutorial, it’s time to dive into content creation. Regularly publishing new posts keeps your audience engaged and helps grow your blog’s presence.
Engagement with the blogging community can be incredibly beneficial. Interacting with fellow bloggers offers:
- Support: Gain insights and advice from those who have walked the path before you.
- Growth Opportunities: Collaborations and guest posts can expand your reach.
- Inspiration: Exposure to diverse content can spark new ideas for your own blog.
Remember, consistency is key. As you continue creating and sharing valuable content, you’ll not only improve your blogging skills but also build a community around your blog. Happy blogging!
FAQs (Frequently Asked Questions)
What is the importance of having a blog?
Having a blog allows you to share your thoughts, ideas, and expertise with a wider audience. It can help establish your online presence, connect with like-minded individuals, and even generate income through various monetization strategies.
How do I choose the right domain name and hosting provider for my blog?
Selecting the right domain name involves choosing something memorable that reflects your blog’s purpose. For hosting, providers like Bluehost offer reliable services with good customer support. It’s essential to compare features, pricing, and reviews before making a decision.
What are the different methods to install WordPress on my hosting account?
You can install WordPress manually or use the one-click installation feature offered by hosting providers like Hostinger. One-click installations are generally easier for beginners but may have some limitations compared to manual setups.
How do I select and customize a theme for my blog?
Choose a theme that aligns with your blog’s purpose and resonates with your target audience. You can find both free and premium themes in the WordPress directory. After selecting a theme, use the WordPress Customizer tool to adjust colors, typography, and layout according to your preferences.
What essential pages should I create for my blog?
Essential pages include an About page, a Contact page, and a Privacy Policy. Each page serves important functions: the About page shares who you are; the Contact page allows readers to reach out; and the Privacy Policy outlines how you handle user data.
What tips should I follow when writing my first blog post?
When writing your first post, access the post editor from the dashboard. Structure your content using headings and paragraphs to enhance readability. Focus on providing valuable information while maintaining an engaging tone to captivate your audience.


